Showing posts with label Under the Sycamore. Show all posts

Thursday, January 21, 2016

Best of my Days 2016

           Christmas morning is extremely fun with a house full of kiddo's let me tell you! I absolutely love it!!
On Thanksgiving, each of our kids draws another sibling's name to buy a gift for. They look so forward to it!
Christmas Eve is their day to exchange their gifts. 
Christmas morning seems to start earlier and earlier each passing year; kids pile on our bed, even our two teenagers who are officially taller than Ben and I both. Stockings are dug into while hubs and I sip espresso,
 the Christmas story is read, presents opened and our bellies full as we enjoy Christmas breakfast.


For the past couple of years, the kids have enjoyed getting "The Best of My Days" as a stocking stuffer thanks to Ashley of Under the Sycamore, 


              You can head to Ashley's blog to download your own...it's never to late to start using them!!
{Warning: You'll want to give yourself plenty of time to browse her blog; it's one of my favorites!} 


Wednesday, January 1, 2014

Merry Christmas. Happy New Year & "Best of my Day's" DIY link up

 
This year I didn't get around to Christmas cards, again. To those special friends who sent me cards,
 I truly loved receiving yours.
This season of life I'm learning that the plans I make, just don't always go the way I want.
 I'm growing through the painstaking process of prioritizing

It's 2014. A new year and there's so very much on my heart.

the abundant life I'm so blessed to live; beautiful friends who inspire me; crafty D.I.Y.
homeschooling six kiddos, one who is on the cuff on being a teenager!


For now, I'll link you over to Ashley's blog, {Under the Sycamore}
Over the Christmas holiday, I made each of my boys one of these "Best of my Days" notepads.
{photo via Ashley}

I originally planned to give these to the boys in their stockings, but I'm so glad life delayed it until today.

While I'm not a "New Year's resolutions" type, I love establishing new traditions,
meaningful traditions.

I know that through recording their joys, each of my boys will grow in the awareness of how abundantly blessed they truly are.

Blessings to you this new day and this new year!!

Thursday, October 18, 2012

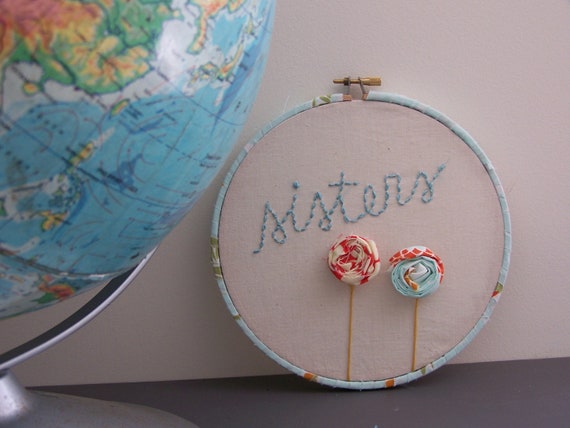
{SISTERS} via Under the Sycamore

I'm sure most of you know the lovely Ashley of Under the Sycamore; if not, you definitely should check out her beautiful blog. Ashley frequently posts awesome DIY projects, photography tips, but mostly you can read about her lovely family ~ she's seriously an inspiration and a beautiful mama!!

Ashley recently adopted a sweet girl from China and so now her little "Firecracker" has a sister.
{As well as three older brothers; can you tell why I love her blog?!  Boys then a little girl, crafting, DIY...}

I've been following their adoption journey, and knew in my spirit that when Little One came home, I wanted to send her a bit of loveliness. This embroidery was inspired by the beautiful bond between sisters.


  I had no idea that Anna from For the Love of Joy had a similar print in her shop, and that they'd end up in this post by Ashley. eeeekkkk!!!! Abundant Blessings to you Ashley and Congratulations!!


     Head to Ashley's blog, but make sure you have plenty of time, you'll easily get lost in all the loveliness!
                            As always, you can purchase your own SISTERS embroidery in my shop.


Tuesday, September 4, 2012

{DIY: covered canisters}

Now that school is in full swing, I'm in You've Got Mail mode, organizing pencils, scissors and paintbrushes.
This lovely D.I.Y. scrap canister inspiration originated by Ashley Ann {here}
                                              

                         These are quick and simple, inexpensive and lovely. Here's what you'll need:


cans {i use my coffee cans}
paper of your choice or fabric scraps {which is what I used}
scissors
hot glue
embellishments of your choice {paper doilies, ribbon, washi tape}


assemble: 

Cut the fabric in lengths that can wrap around the can, then hot glue and embellish!
For the can on the left, I used a large paper doily, then layered a vintage crochet doily on top.
Repeat a dozen times!


     You can check out my other D.I.Y. projects under the {Ideas}section.